Indicators
Indicators are the input values for the signals and for some of the modules. Before you can use any indicators in your EA, you will first have to add these in the Indicator section. We advise you to give your indicators names that are easy to distinguish. By default we offer you all the standard MT4 and MT5 indicators, which you are probably already used to.
We've added a couple of predefined values, which are technically not indicators, but these can still be found at the indicator part of our platform: Bar Open, Bar Close, Bar Low, Bar High
Add an indicator
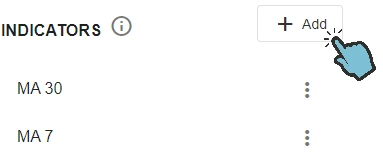
You can add an indicator to your expert advisor by clicking on the + Add button.
Indicator list
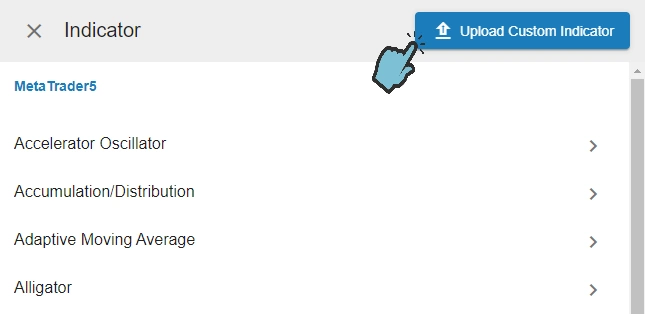
Now you will be presented with a list that contains all MetaTrader 4 or 5 indicators. Here you can select an existing indicator or you can upload your custom indicator.

Indicator parameters
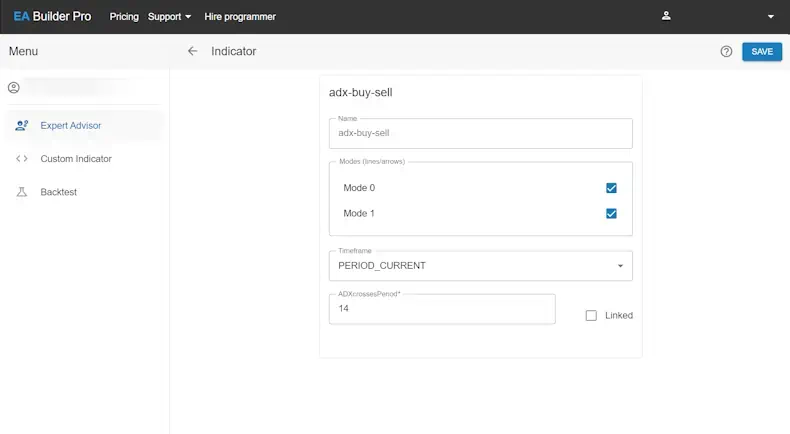
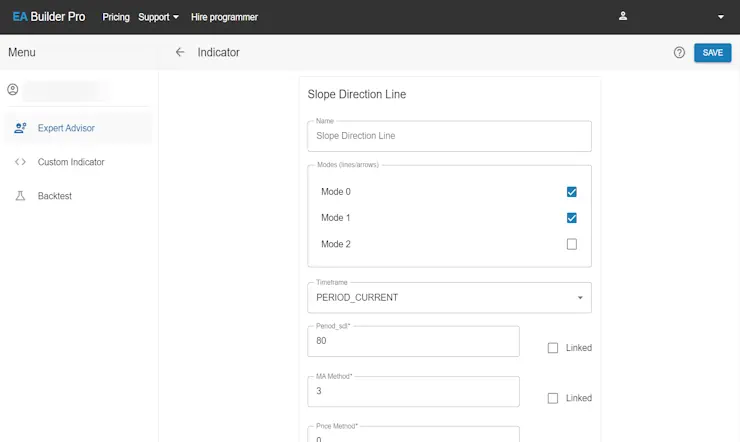
Click on an indicator in the list, this will bring you to the indicator parameter page. Here you can name your indicator and set its parameters. When done, click on the Save button and you've added an indicator to your expert advisor. If you can't click Save, it means you've forgotten to enter a mandatory parameter.
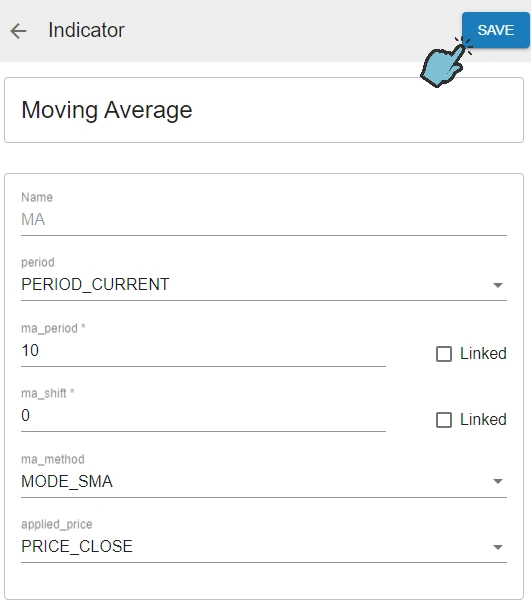
If you've looked carefully at the image above you may have noticed a checkbox called 'Linked'. If you've added the same indicator multiple times to your EA (with different parameter values) and you want this parameter to result into 1 input (variable), then enable this checkbox. By only having 1 input, instead of multiple, you simplify and speed up optimization in MetaTrader.
Upload a Custom Indicator
There are 2 ways to upload a custom indicator:
- Use the 'Upload Custom Indicator' button when adding an indicator to your EA.
- Use the 'Custom Indicator' page, which you can find in the menu.
We support custom indicators in both mql- and ex format. Mql is the source code file and is the preferred format. In case you do not own the mql source code, it is possible to upload the ex file, for which we will do a best effort to support using this indicator. Our webtool will analyze this compiled ex file to decide which parameters this indicator uses. Remember, after uploading an ex file it is queued for analyzing, which can take a few minutes (up to 15 minutes) before your file is analyzed and ready to use. When done, you can click on the indicator and use it in your expert advisor. To upload a custom indicator click on the Upload Custom Indicator button.
Once you uploaded your indicator, you can select it at any time in the list of indicators. Custom indicators can be found at the top of the list.
Now you've uploaded your custom indicator! You've probably experimented with this indicator in MetaTrader, or you've been using it already. If not, please do so and get acquainted with your indicator, because we assume you know which input values you want to use. However, the Mode parameter requires some attention.
The Mode parameterIf your custom indicator has more than one possible value (lines/ arrows/ etc.), it is important to select the one you want to use in your EA. To find the correct Mode input value, you must investigate at which (change of) value you want to take action. There are 4 common types of modes, so you're probably waiting for:
- an object, like an arrow;
- a colour switch;
- a line to cross a value;
- a line to cross another line.
As you know indicators can sometimes draw multiple arrows or lines. You probably use these in your manual (visual) trading feedback and decisions. Now that you continue to automate your strategy you want to select these arrows or lines. It's important to know an indicator exists of multiple collections of arrows or lines, for example one for the up-arrows and one for the down-arrows. Both are maintained in their own list of values. To select the correct list(s), you select the corresponding mode. If you don't know this mode yet, you can use the following strategy to get this Mode value: First, remove all current indicators added to the chart. Then, load your indicator in MetaTrader. Example: let's assume you have attached this indicator to the chart:
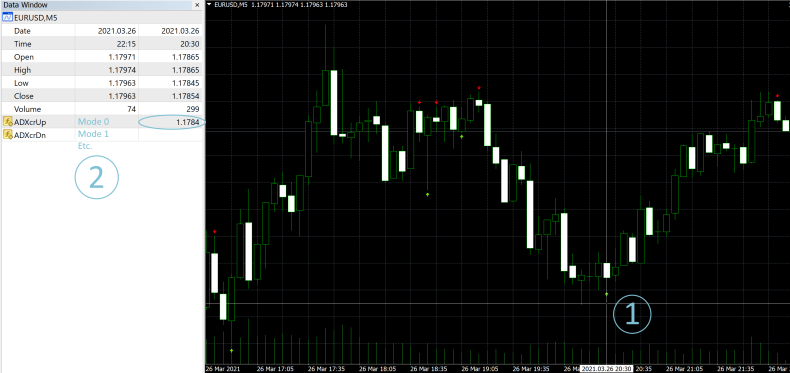
Note that the mouse pointer in the image above is at the up arrow (1). The Data Window is open in MetaTrader, as you can see on the left side of the screen(2). You should have the Data Window open as well. You can open it by pressing CTRL + D in MetaTrader, or by finding it using the menu on top of the screen. In our example, you can see that the data window displays 2 rows (at the yellow icons near (2)). These are the 'modes' (the collections with arrows) that the indicator is giving us, which we can use. The rows have 2 columns. The first column shows the values the indicator gives at 20:15, one bar before the bar selected. The second column shows the values the indicator gives at 20:30, the currently selected bar with the arrow. One of the two rows displays a value. It's the value of the price on the chart the arrow is painted at.
This is all the information you need to automate an EA using this indicator, because now you know:
- The up arrow is at Mode 0 (the first item), the Down arrow is at Mode 1 (the second item)
- The arrows appear when the list of values (selected by mode) switches from having no value, to having a value. The actual value is irrelevant for arrow indicators, what matters is that the arrow is there. The moment in time when the arrow appears is also important, as you will understand in a minute when discussing Shift.
In order to use this indicator in our EA, once uploaded, we must select both the mode for Buy (Mode 0) and for Sell (Mode 1). When saving the indicator we advise to use a short name for your indicator.
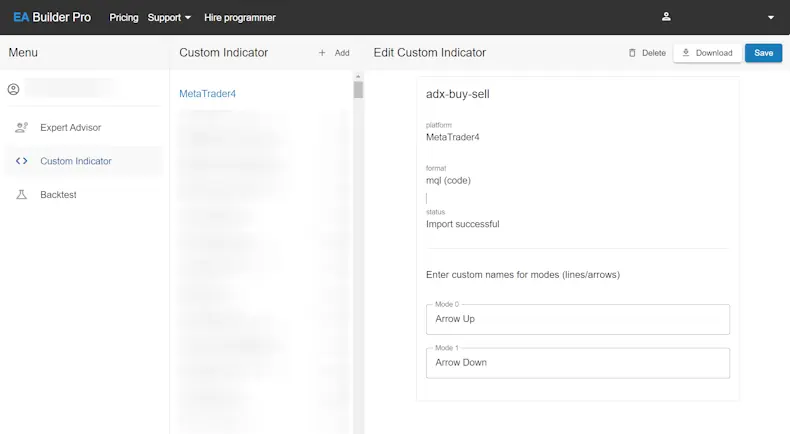
Once you have added the indicator you can move on to creating the buy/ sell signals, but there's one more step you can take before that. If you want to rename the 'Mode 0'/ 'Mode 1' to a more logical name which you don't have to remember, please open your menu and go to 'Custom Indicator'. Select your indicator and edit the names of 'Mode 0' to 'Arrow up' and 'Mode 1' to 'Arrow down'. Now return to your EA.
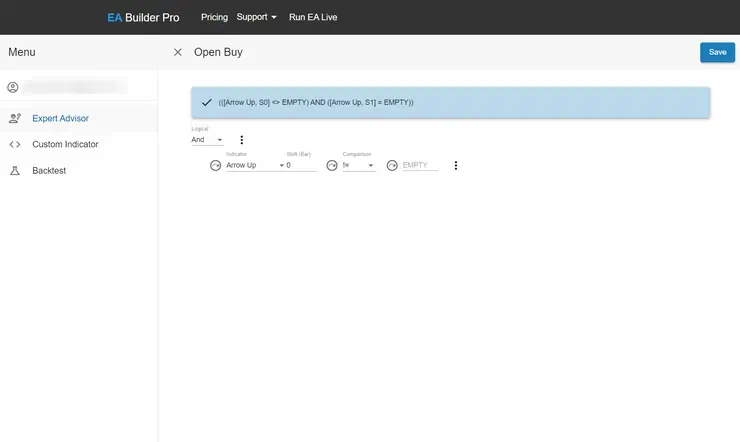
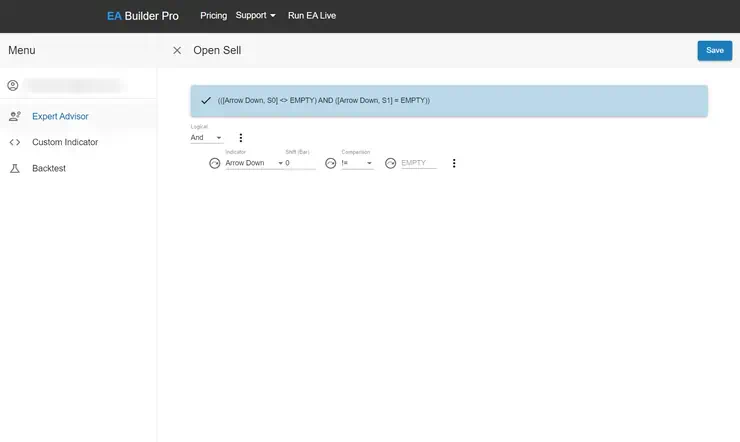
Next, the Signal has to be created. The Signal will make sure the order is opened when the arrow is displayed. So in this example we check that the value of 'Arrow Up' is unequal (!=) to an empty value, because once there is a value, MetaTrader will draw the arrow.
That's it! Your EA is ready to Export and test.
If you want to switch between Buy and Sell at the moment the arrow changes direction, you will have to make sure your Open Buy signal is exactly equal to the Close Sell signal and the Open Sell signal is exactly equal to the Close Buy signal. You can use the Copy/ Paste options for this to be sure you don't make any mistakes.
You're waiting for a colour switchAs you know indicators can sometimes show a line which changes colour from red to blue (or any colour) and vice versa. You probably use these in your manual (visual) trading. Now that you want to automate your strategy you want to aim at these colour switches. It's important to learn that this type of indicator sometimes exists of one collection of values, each value representing the colour, but sometimes multiple collections: one collection per colour. These collections are selected by choosing the correct mode(s). To get the correct Mode, you need to load your indicator in MetaTrader: First, remove all current indicators added to the chart. Then add your indicator to the MetaTrader chart. Now, let's assume you want to use this indicator:
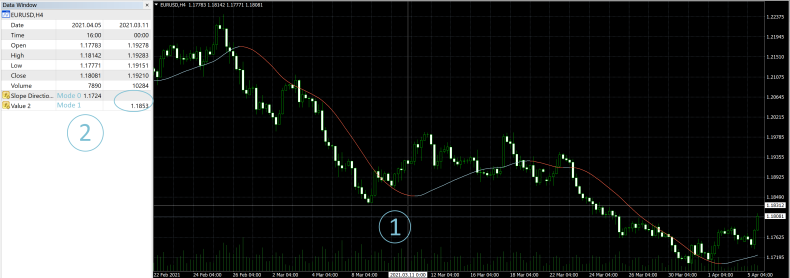
Note that (1) is at the sell colour (red) in the image above. The Data Window is open in MetaTrader, as you can see on the left side of the screen. Also, you can see that the Data Window displays 2 rows (at the yellow icons close to (2)). These are the modes that the indicator is exposing in the Data Window, which can also be used by your EA. The rows have 2 columns. The second column shows the values the indicator gives at the selected bar (1), which is at 00:00. One of the two rows displays a value: the second row, which has label 'Value 2'. When you would move your mouse pointer to the right to the next bar, to the blue (buy) colour, you would see the first row is filled and the second row will empty instead.
This was all the information you need to automate an EA using this indicator, because now you know:
- Buy (blue) colour is Mode 0, Sell (red) colour is at Mode 1
- The colour appears when the indicator switches from having no value, to having any value. It's irrelevant which value, as long as it has a value the color will be displayed on the chart.
In order to use this indicator in your EA, we need to add the indicator and select both modes.
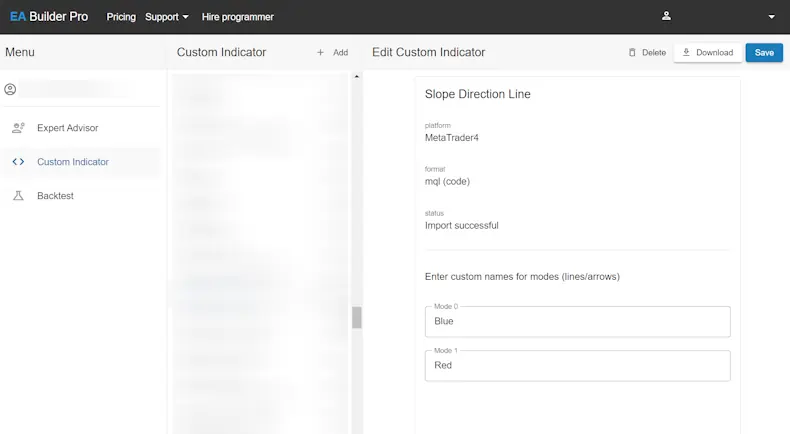
Once you have added the indicator you can move on to creating the buy/ sell signals, but there's one more step you can take before that. If you want to rename the 'Mode 0'/ 'Mode 1' to a more logical name which you don't have to remember, please open your menu and go to 'Custom Indicator'. Select your indicator and edit the names of 'Mode 0' to 'Blue' and 'Mode 1' to 'Red'. Now return to your EA.
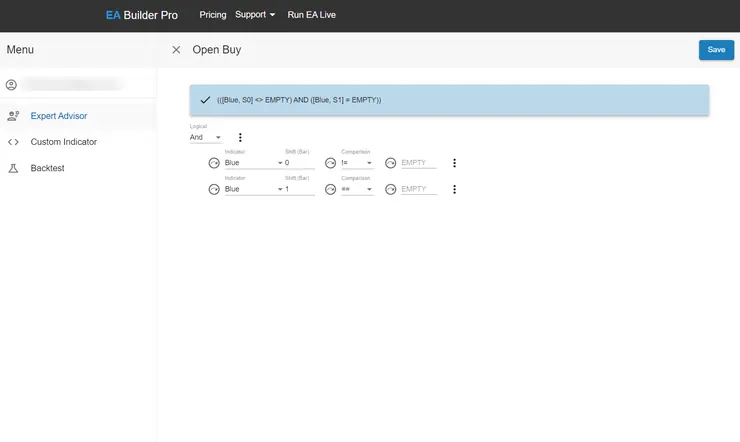
Next, the Signal has to be created. The Signal will make sure the order is opened when the colour is displayed. Think about the logic behind this. As you are able to see in image 8, the value of the indicator is empty when the colour is not displayed and the value is not empty when the colour is displayed. That's why we check that the value of the previous bar is equal (==) to 'Empty' value and the value of the current bar is unequal (!=) to 'Empty' value.

That's it! Your EA is ready to Export and test.
While running the test I found out that the value switch isn't applied to the current bar by the indicator, but to the previous bar, so I had to change the Shift input for both custom indicators (Blue and Red) to value 1.
If you want to switch between Buy and Sell at the moment the colour changes every single time (instead of working with TP/ SL), you will have to make sure your Open Buy signal is exactly equal to the Close Sell signal and the Open Sell signal is exactly equal to the Close Buy signal.
You're waiting for a line to cross a value or
You're waiting for a line to cross another line
These types of indicators work exactly the same as the above indicators for adding arrows/ colour indicators for finding the correct Mode input. Also, you will add the indicator once for every line in the indicator you will want to use in your signal. The only difference is the Signal part, where you will have to check for a crossover to occur. Creating a crossover is explained at the Signals page.
Shift
By giving 'Shift' value 0, you select the indicator's value at the current bar. Shift 1 represents the previous bar, 2 the next bar, etc. It's important to choose the value which represents the bar on which you want to act in your Signals and Modules.
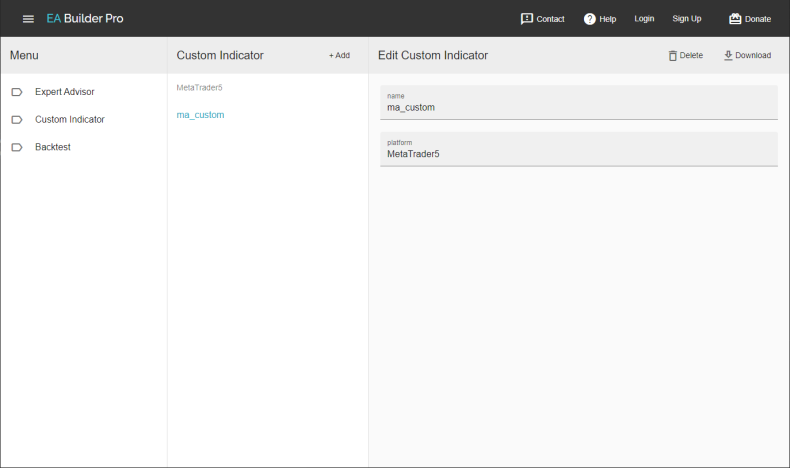
Custom indicator page
Here you can upload, download or delete your custom indicators. You can also see which custom indicator is use by which expert advisor. If you would like to delete your custom indicator make sure it is not used by any of your expert advisors or else it cannot be deleted.
Next: Signals