Build an EA with EA Builder Pro
If you came here because you’re starting the endeavour of building a trading robot (EA), you’ve come to the right place! This tutorial will focus on building an EA using EA Builder Pro. You can build our example EA by following us in our footsteps, or you can make you own decisions, using the extra information provided by this tutorial.
Before we begin
Section titled “Before we begin”This tutorial gives an example of building an advanced EA and the tutorial can feel quite complex as well.
If you’d like to start with an easy complexity EA, try our YouTube channel: Learn to build a trading bot.
If you’d like to start with a medium complexity EA (MT5 only), we’d like to mention that one of our long-term users, Raoul, has written a blog about his EA and how he built it using our tool. Feel free to have a look at Roaul’s blog.
How to create an EA using EA Builder Pro?
Section titled “How to create an EA using EA Builder Pro?”Let’s get started! In this advanced tutorial we will be creating the famous ‘Cowabunga’ EA. This EA will use the trend on the H4 (4 hour) timeframe to act as a filter and then look at the M15 timeframe for opportunities to go long or short.
Let’s write down the entries/ exits, which we call ‘Signals’ as a general term for a collection of conditions for entries and exits.
Open buy signal:
The filter for going long checks if the trend is up. The trend is up when on the H4 timeframe:- the 5-bar EMA is above the 10-bar EMA
- RSI is bigger than 50
- Stochastic is moving up but not overbought
The entry opportunities for going long on the M15 timeframe are:
- MACD crosses up the 0 value or
- MACD is negative but just started going up
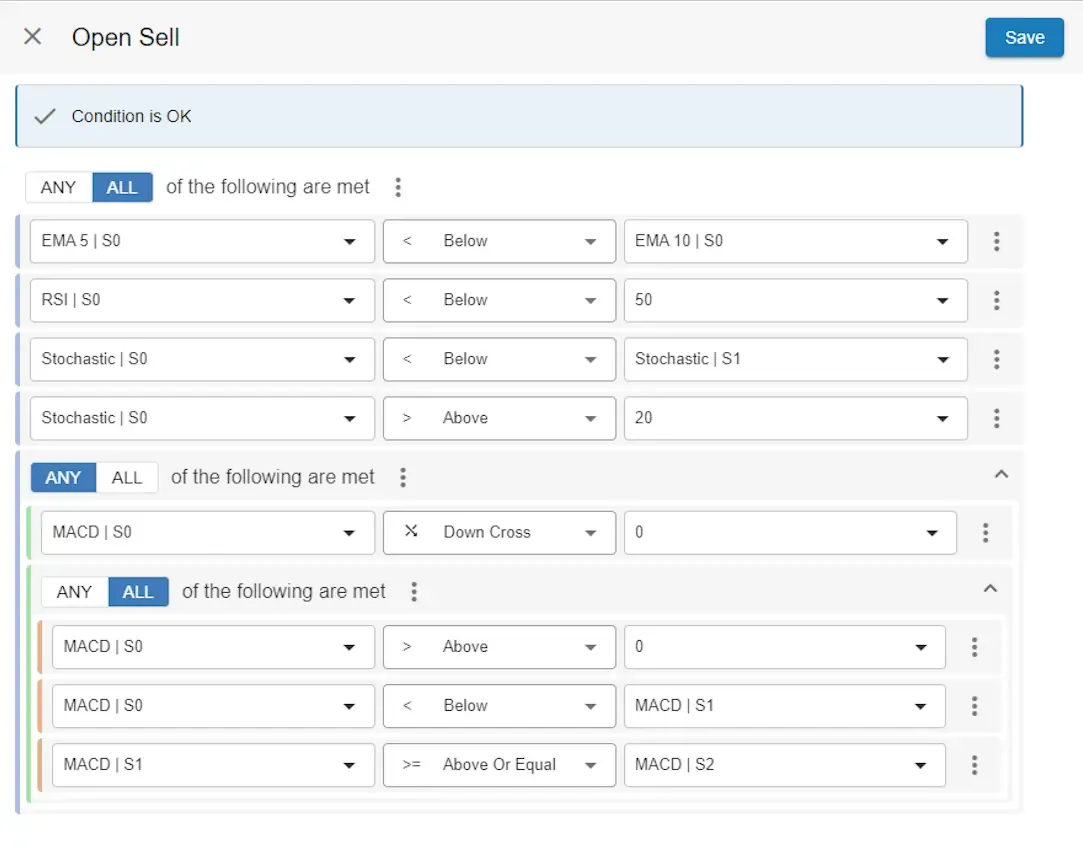
Open sell signal:
The filter for going short checks if the trend is down. The trend is down when on the H4 timeframe:- the 5-bar EMA is under the 10-bar EMA
- RSI is smaller than 50
- Stochastic is moving down but not oversold
The entry condition for going short on the M15 timeframe are:
- MACD crosses down the 0 value or
- MACD is positive but just started going down
Close strategy (for buy and sell both):
We’re going to set 50- and 00 price levels as our exit signals’ target. So, if the price when opening a buy order is 1.09887, then we will target 1.10000, which is 11.3 pips up. However, if the target is less than 5 pips away only, we will change tactic and set the exit at the distance of the order’s open price to the Parabolic SAR. So, if Parabolic SAR is 10 pips under the order’s open price, then we will set the exit to 10 pips above the order’s open price.
We will also set the stop loss to the value of Parabolic SAR when SAR is below the order’s open price.
Well, that’s quite something! The EA you had in mind may be less complicated than that. Actually 9 out of 10 trading strageties are less complicated than the Cowabunga strategy. However, we wanted this tutorial to show EA Builder Pro is capable of creating advanced EAs and at the same time make sure you learn enough to create advanced EAs yourself. If you just started building EAs and notice during this tutorial that you have questions and need additional help, please Subscribe and send us your questions. Now, let’s continue!
1. Get Started
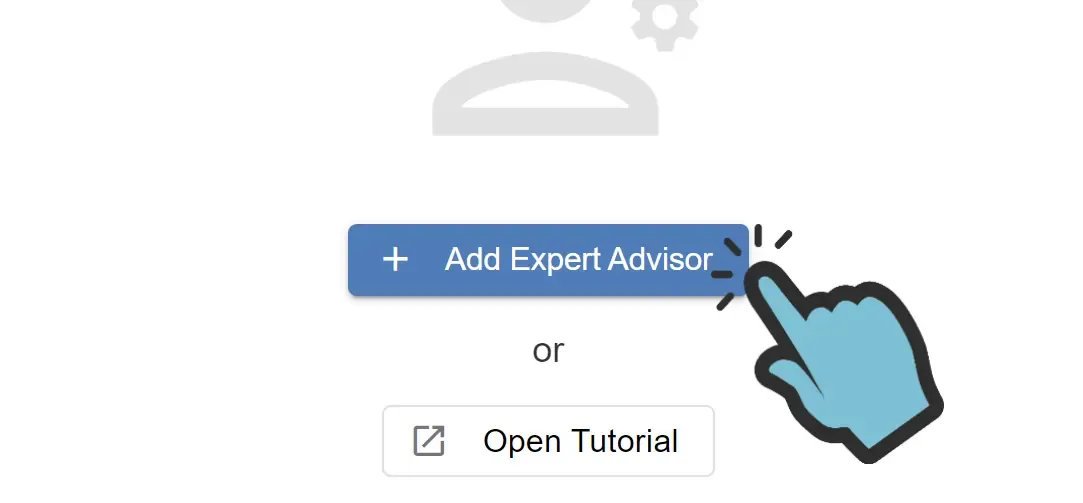
Section titled “1. Get Started”To get started creating our first Expert Advisor (EA), which is a trading robot, click the blue “Add Expert Advisor” button, which you can find when using our Webtool.
Choosing a template
Section titled “Choosing a template”Next, you will be asked to choose a template for either MT4 or MT5. If you don’t know which one to choose, please see my Blog: MT4 or MT5, which is best? Next, decide if you want to start with a working example, for example the ‘Moving average template’, or if you want to start with an empty EA. Since we’re going to build a new EA from scratch and we’re going to guide you through all the steps, we’re going to choose ‘Empty template’.
Name and create
Section titled “Name and create”Next, enter a name for your EA. We will name our EA ‘Cowabunga’ and then we will click “Create EA”.
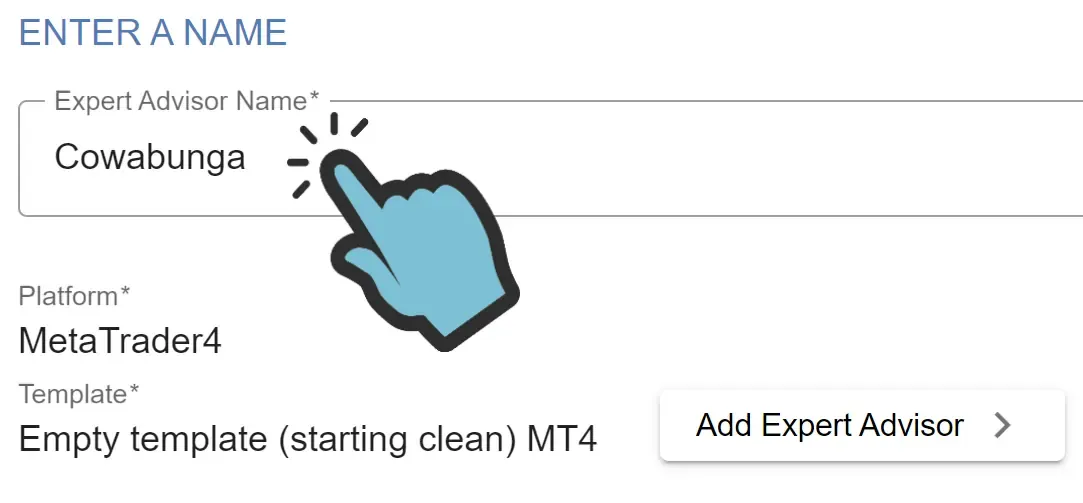
The tool will now automatically open your EA, split into 4 main parts: Indicators, Signals, Strategy and Money management. In the next part of this tutorial we will start with the first section: Indicators.
2. Indicators
Section titled “2. Indicators”Now we’re going to add indicators to this EA.
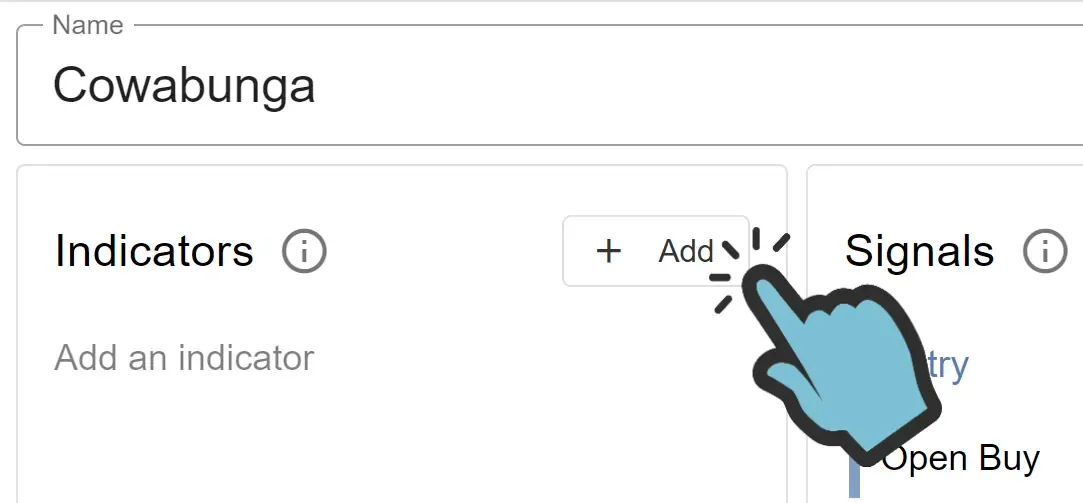
To add an indicator, click ‘Add’ on your indicators list.
You’re offered to choose from all standard MetaTrader indicators sorted by alphabet. If you have uploaded your own custom indicators these will also be available at the top of the list. The number and variety of indicators you can add is unlimited.
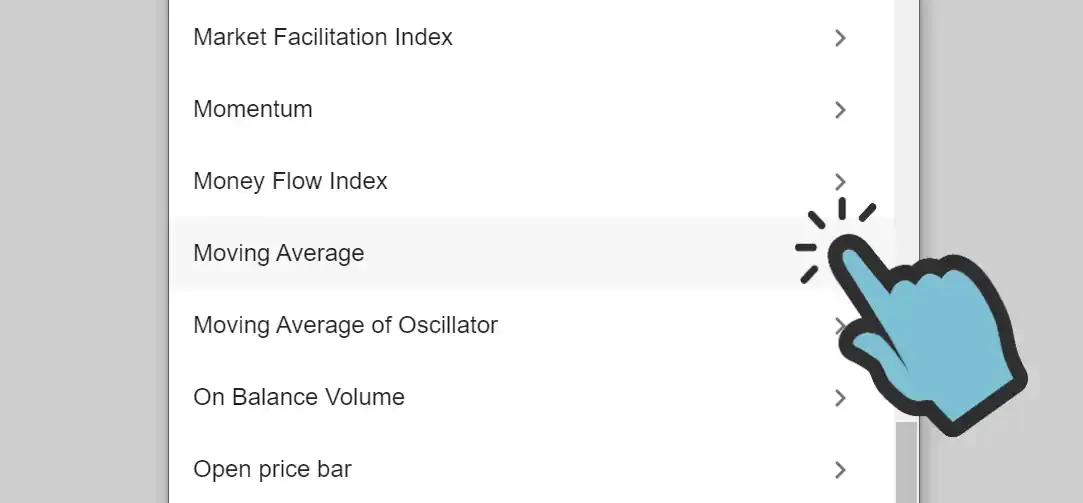
For our EA, we’re going to add the “Moving Average” indicator. In fact, we will add this indicator 2 times. Do you remember our goal for your EA, stated in the beginning of this Tutorial? We’re using 2 different variants of EMA.
Now, find the “Moving Average” indicator in the list:
After selecting the indicator, you will see all the parameters of the indicator. You should be familiar with these parameters, because these are the same parameters as shown in MetaTrader when adding an indicator to the chart. The values you enter here will be the values your EA will use for this indicator, at every trading decision which is referencing this indicator.
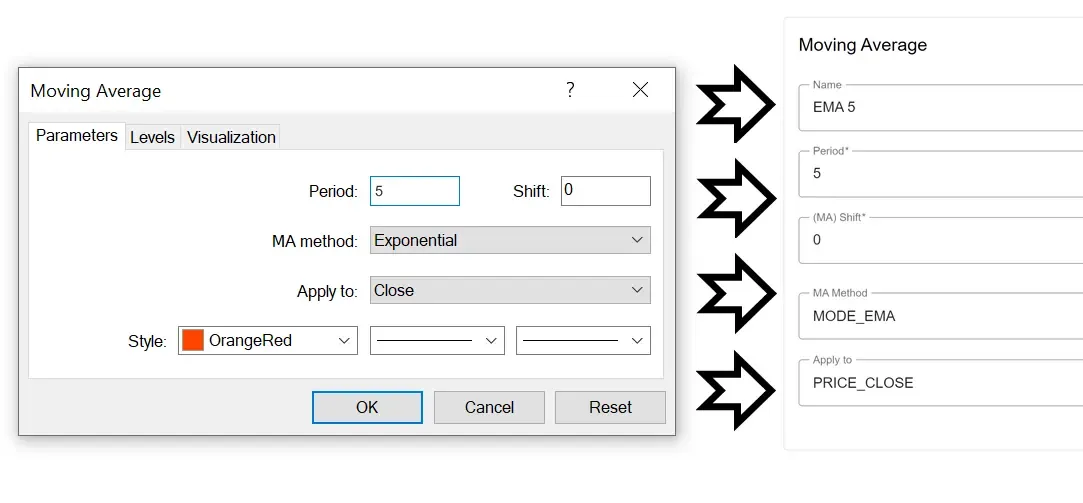
This is how we’ve setup the indicators (parameters not mentioned keep their default value):
- Moving average: Name ‘5 EMA’, Timeframe ‘PERIOD_H4’, Period ‘5’, Method ‘EMA’, Applied price ‘Close’
- Moving average: Name ‘10 EMA’, Timeframe ‘PERIOD_H4’, Period ‘10’, Method ‘EMA’, Applied price ‘Close’
- Stochastic Oscillator: Name ‘Stochastic’, Timeframe ‘PERIOD_H4’, K period ‘10’, D period ‘3’, Slowing ‘3’, Method: SMA, Price field: Low/ High, Mode: Main
- Relative Strength Index: Name ‘RSI’, Timeframe ‘PERIOD_H4’, Period: 9, Apply to: Close
- MACD: Name ‘MACD’, Fast EMA: 12, Slow EMA: 26, SMA: 9, Applied price: Close, Mode: Main
- Parabolic SAR: Name ‘PSAR’, Step: 0.02, Maximum: 0.2
After you’ve set up all indicators, you should have a list of indicators which looks like this:
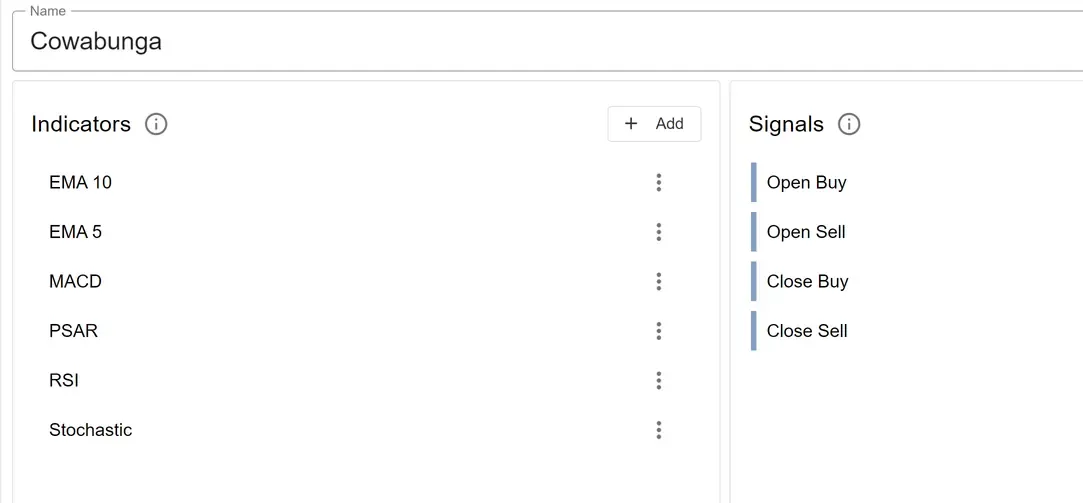
We’ve now added all indicators and now we can move on to the next part.
2b Custom Indicators
Section titled “2b Custom Indicators”If you want to use custom indicators, watch our tutorial video, or read how to achieve this: Custom indicators.
3. Signals
Section titled “3. Signals”With the indicators added to your EA, your EA will not yet open or close any orders. You only made the indicators (and their parameters) known to your EA. So, next task will be to create the entry/ exit signals, which consists out of one or multiple condition(s), which define when the EA will open and close orders. First, choose which signal you will be creating first. We strongly suggest you start by creating the ‘Open Buy’ signal and create the other signals when you’ve verified a buy order is opened at the correct moment. Only then, you should create the other signal(s). We suggest you do this, to keep the complexity of creating and adjusting signals as low as possible while you’re still learning. We will do this now, so we start by creating the Open Buy entry signal.
The 4 types of signals are:
- Open Buy: when this signal activates, your EA will open (enter) a buy order.
- Open Sell: when this signal activates, your EA will open a sell order.
- Close Buy: when this signal activates, your EA will close (exit) your buy order(s), unless the Open Buy signal is active at the exact same time.
- Close Sell: when this signal activates, your EA will close your sell order(s), unless the Open Sell signal is active at the exact same time.
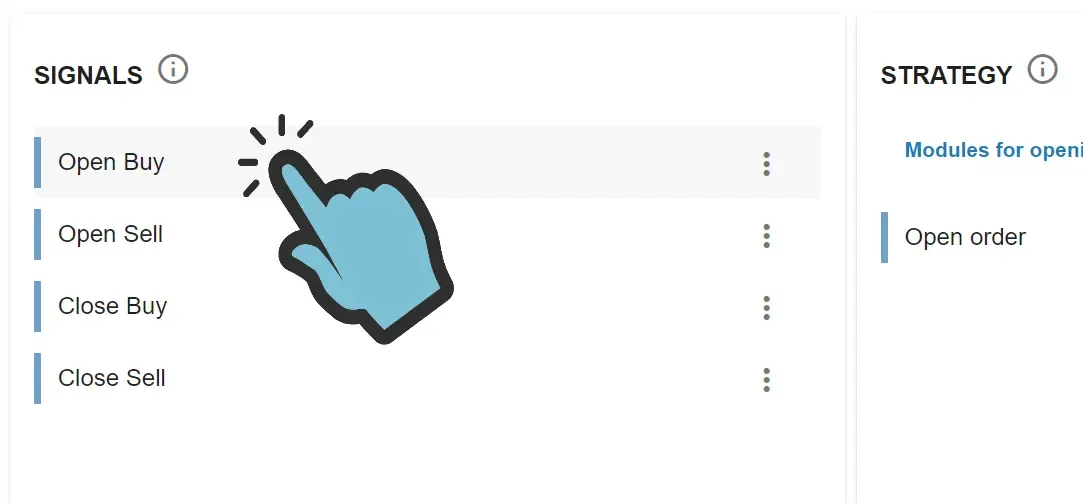
To create the Open Buy signal, click ‘Open Buy’ in your EA’s main screen.
If you’ve chosen the ‘Empty template’ in Part 1 (EA Builder Pro - Getting started) of this tutorial, then you’ll now see an almost empty screen. This is because the signal is still without conditions. We’re going to have to add the condition(s), which forms the Signal, ourselves.
You are probably seeing this:

The signal displays a placeholder to enter your first condition. To add more conditions, click the ‘menu icon’, which looks like 3 dark dots in a vertical position. Once you’ve clicked it, we’re going to choose ‘Add Condition’ to add a condition. Repeat this step 3 more times, so that you’ve got 4 conditions added to the signal in total, which all look the same.
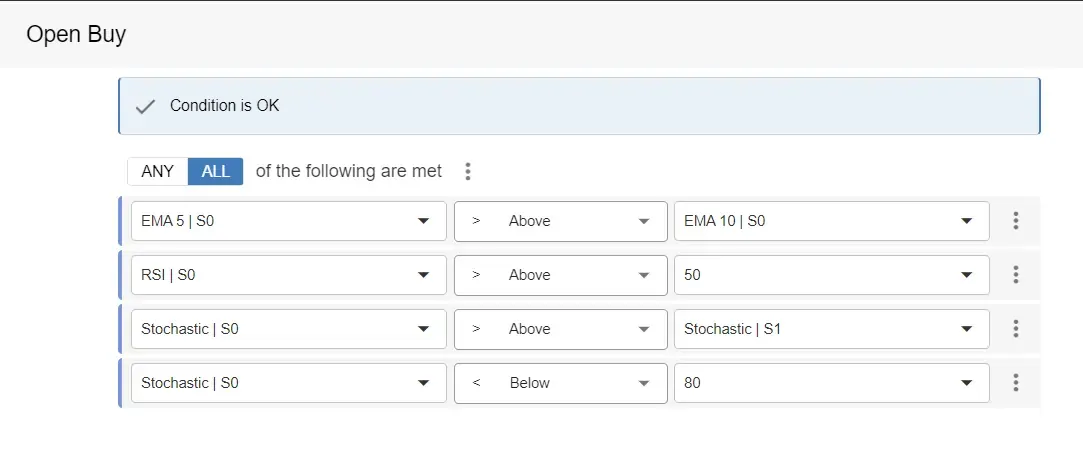
Remember our Open Buy signal from the Tutorial introduction page? Let’s rephrase the Open buy signal:
- the 5-bar EMA is above the 10-bar EMA
- RSI is above 50
- Stochastic is moving up, but not overbought
- MACD crosses up 0 or
- MACD is negative but just started going up
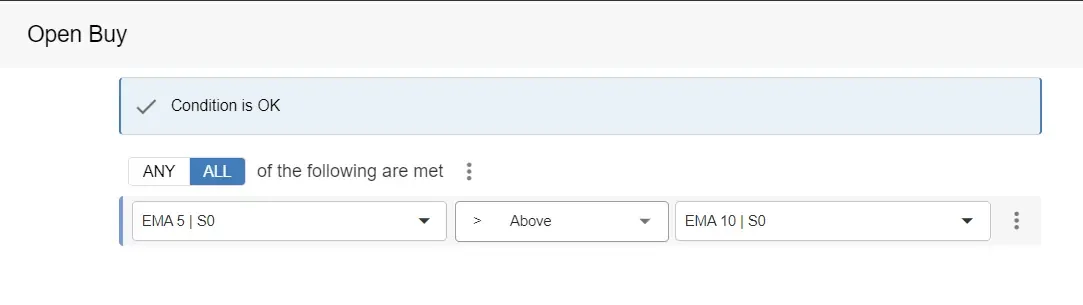
Now let’s adjust the conditions we just created so that the conditions match the description of the first part of the Open Buy signal: 1. The 5-bar EMA is above the 10-bar EMA
To check if the EMA 5 indicator value is above (>) the EMA 10 indicator value, we will compare the indicator to another indicator by using the ‘above’ (>) operator.
2. RSI is above 50
To check if the RSI indicator value is above (>) 50, we will compare the indicator to the value by using the ‘above’ (>) operator. In order to select ‘50’, you will first need to change the right part of the condition to ‘Constant’ instead of ‘Indicator’ more info.

3. Stochastic is moving up but not overbought
Here we have to use 2 conditions, one for checking if the indicator is moving up and one for checking if the indicator is not in the overbought area.
- To check if the Stochastic indicator is moving up we need to compare the previous value of the indicator with the current value of the indicator. When the value is increasing, it is moving up. So, to check if the line is moving up, we need to check if the current value (shift 0) is above (>) the previous value (shift 1).
- To check if the Stochastic indicator is not in the overbought area we need to check if the indicator’s value is below 80. We will do this by using the ‘Below’ (<) operator.
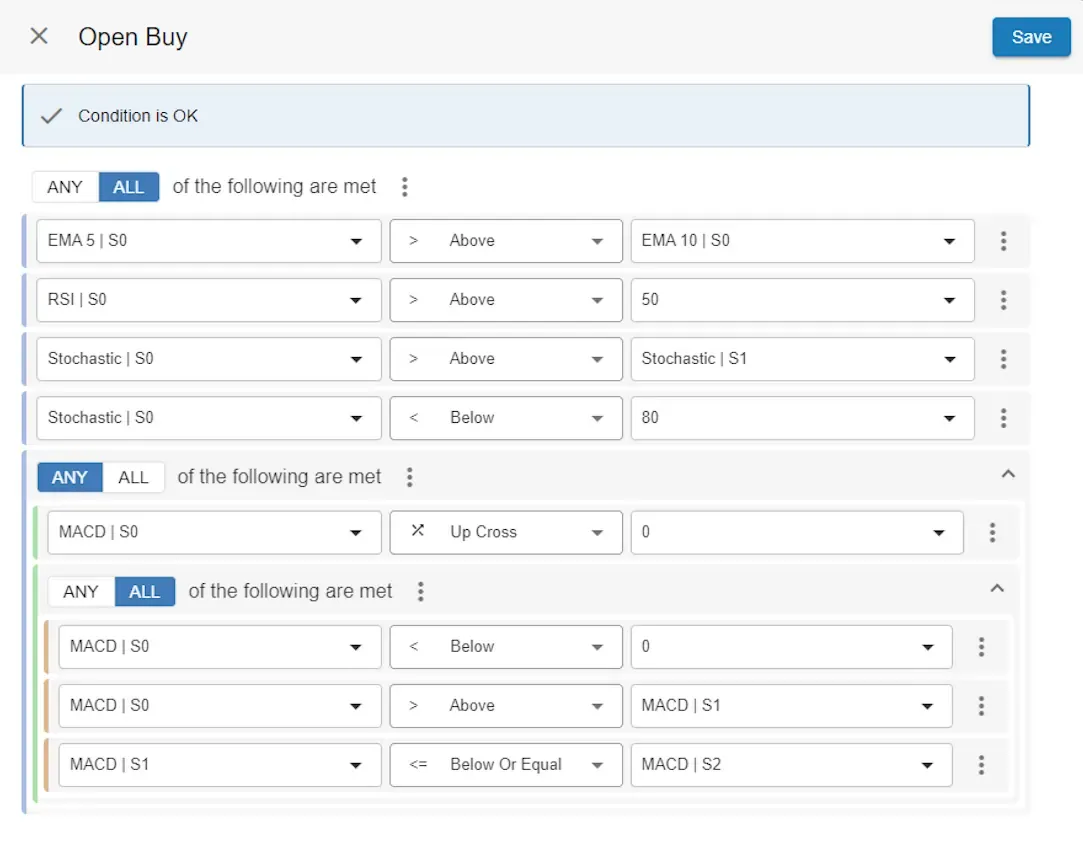
4. MACD crosses up 0 or MACD is negative but just started going up
Now we’re going to add another (the 5th) condition to our signal, but we will now choose ‘Group’ and select ‘Any’. Use the menu of the new ‘Any’ group and add another condition and another (second) group. On the second group, select ‘All’. Use the menu of the second group and add 3 Conditions. Great! You’re getting the hang of it now!
So, on the first group we have 2 conditions, but only one needs to be true, which is why we used the ‘Any’ for the first group. The second group contains 3 conditions. However, for the second group we use the ‘All’ operator to tell the EA that all conditions have to be met.
We’ve now created the first signal. Now it’s time to test the signal, so we’re going to:
- Export the EA.
- Place the EA in the ‘Experts’ folder (which happens automatically in MT5 when double-clicking the downloaded file, for MT4 do this manually).
- Run the EA in MetaTrader’s Tester in ‘Visual mode’.
- Verify a Buy order was opened at the correct moment.
Now that we’ve got the first Signal working, we’ll also be creating the other signals:
Open Sell
Close Buy Remember I said on the starting page of this tutorial that this tutorial was going to be advanced? Well, here we go. If you soon feel overwhelmed, don’t worry: try first, rest if this will help you and come back later. This is a learning experience which will come with results on the long term.
Let’s reiterate on the close strategy: We’re going to target 50- and 00 price levels, but only if the next level is more than 5 pip away. Otherwise, we’re going to set the target to the distance to the value of Parapolic SAR. We’re also going to set a stop loss, for which we will use a stop loss module later on in this tutorial.
So, how are we going to do all that? We know that our close signal will exist out of 2 conditions:
- Distance to the next price level must be more than 5 pip away.
- Price must be higher than open price + distance to the next price level.
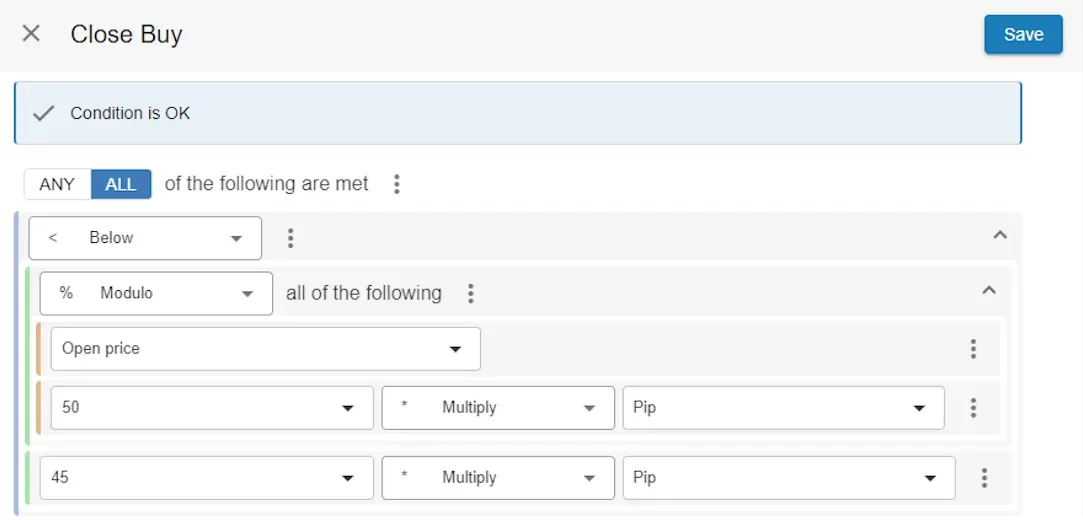
1. Distance to the next price level must be more than 5 pip away
To know how far away the next price level is, we have to calculate the remainder of the order’s open price, devided by the price level’s distance, which is 50 pips. When using arithmetic operators in our webtool, select the ’%’ (modulo) operator to calculate the remainder of a division. So when we calculate: 1.09887 (the open price) % 0.00500, the remainder is 0.00387 (38.7 pips). So if we can create a condition which checks if the remainder is less than 45 pips we know the distance to the next price level is more than 5 pips away.
Now, let’s create the first condition:
Close Buy
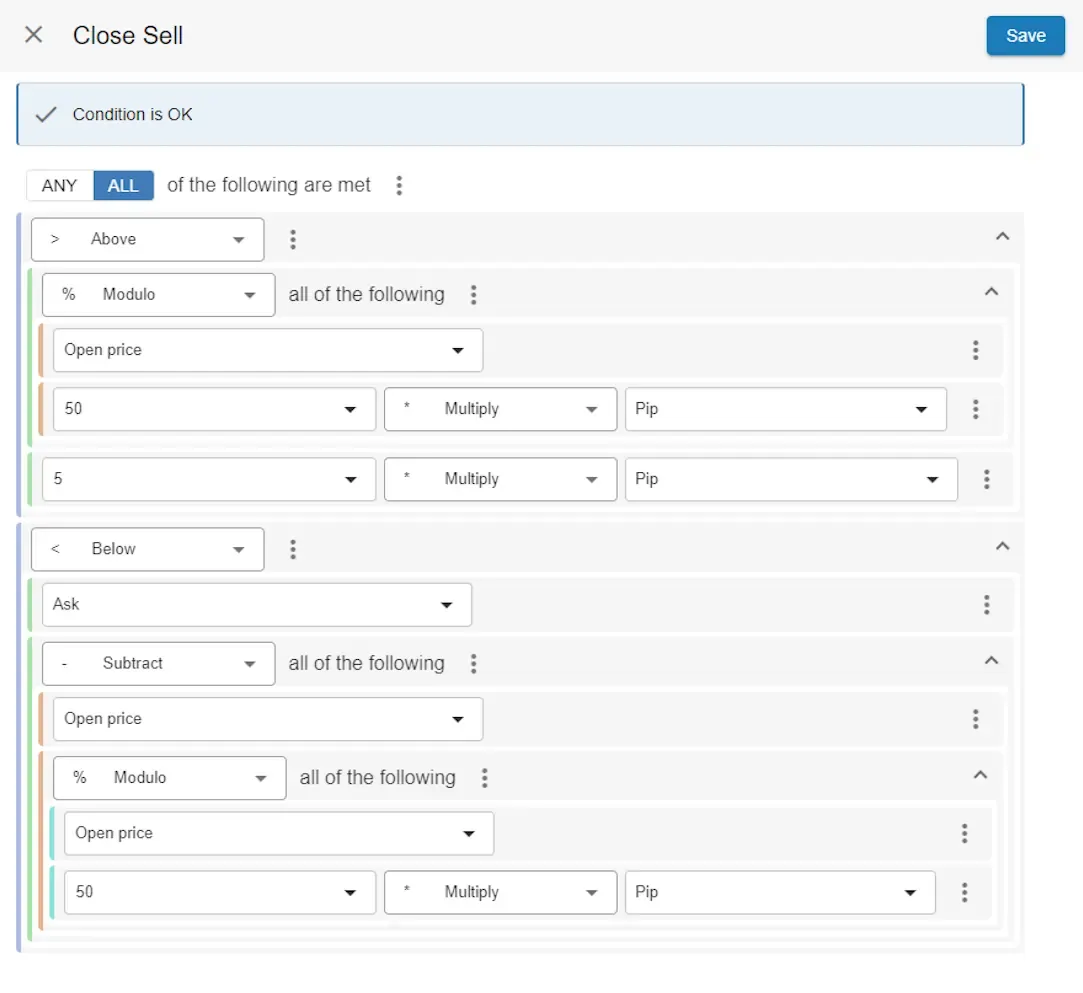
2. Price must be higher than open price + distance to the next price level.
Now, because the first condition is set, the second condition will only be evaluated if the distance to the next price level is more than 5 pips away.
The second condition will check if the current price has passed the next price level. To do this, we have to check if the price is above the order’s open price + the distance to the next price level. The distance to the next price level can be calculated by substracting the remainder from 50 pips. So, the calculation is 50 pips - (open price % 50 pips) = amount of pips to the next price level. So, we close our buy order if the Bid price is above the order’s open price + (50 pips - (open price % 50 pips)).
In our example this translates to 1.09887 + (0.00500 - (1.09887 % 0.00500)) = 1.01000. So if the price rises 11.3 pips the order will be closed. Here’s the condition to check if Bid is above (>) open price + (50 pips - (open price % 50 pips)), combined with our first close condition:

Pep talk WOW! you’ve created the close buy signal! Wait… are you still here? Don’t worry if you’re still doing the calculations on paper to check all this and to try to understand. Also feel free to take a break when building EAs, it does take practise and often it feels like a puzzle, but you’ll get better at it and before you realize you’re building any EA you can imagine!
Close Sell Here’s the close signal for sell orders. It’s basically the same signal as the signal for closing buy orders, but opposite.
If you want to know more about Signals and what they’re capable of, please check the in-dept Signals documentation. You’ve now created the EA’s Open- and Close signals, which means that your EA will already trade automatically. However, there’s more. There are all kinds of ways to change the behaviour of your EA. These are the so called ‘Modules’ which we will also use for our EA.
4. Modules
Section titled “4. Modules”With the signals added to your EA, your EA will now open and close orders. Two more tasks remain: setting the alternative take profit to PSAR, in case the target is less than 5 pips away and secondly, setting the stop loss equal to the value of PSAR as well. To do this, we will have to add the Take profit - Conditional (Pro) and the Stop loss - Conditional (Pro) module twice, once for buy and once for sell. So we will end up with 4 close modules: 2 times for take profit and 2 times for stop loss.
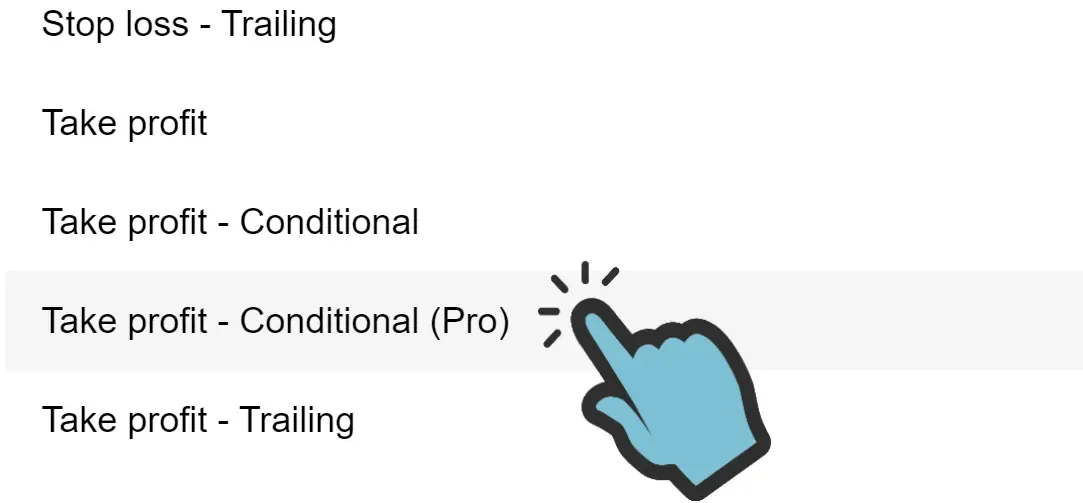
To add the Take profit - Conditional (Pro) module, click ‘Add’ in the Strategy part of the EA’s main screen.
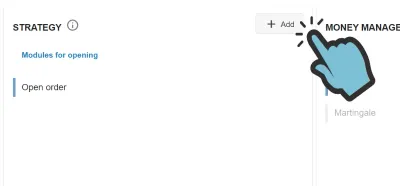
You will now see a list of all modules you can add to your EA. We’re going to add the Take profit - Conditional (Pro) module, which is one of the most advanced modules. After clicking Add, you’re looking at the list of modules:
You now need to enter the modules’ parameters. We will want to enter a name and other basic settings first:
- Name: Buy TP
- Enabled for: Is Enabled For Buy Order (to only enable this module for buy orders)
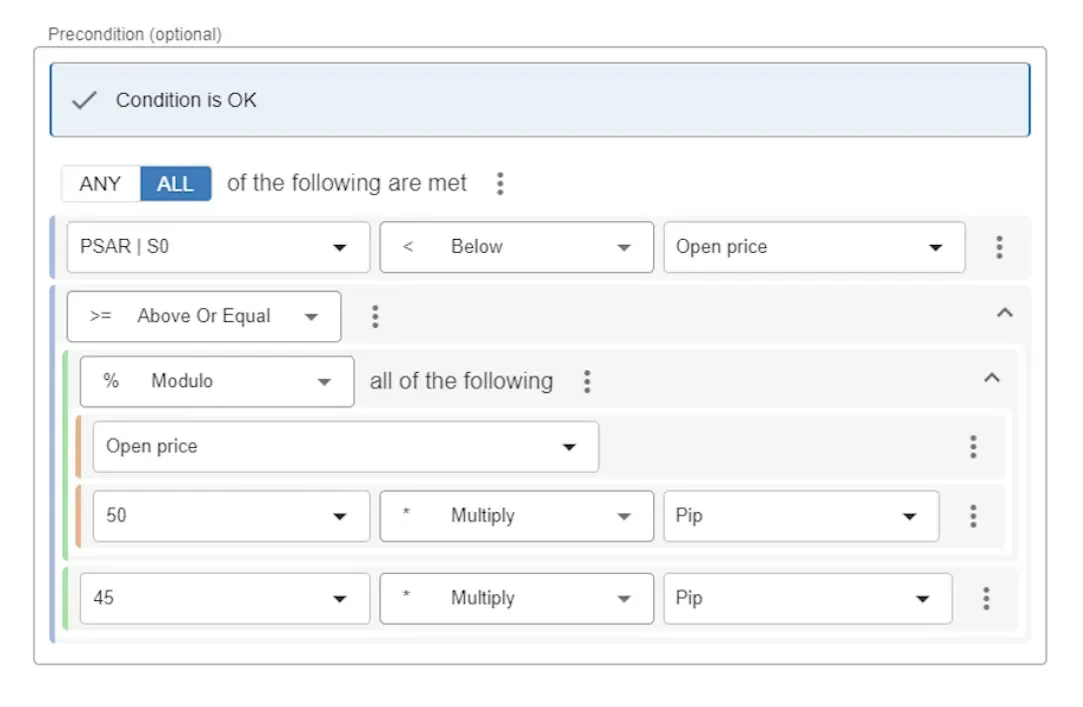
We will then define the precondition, which means the condition which has to be met before the TP will be set. Since we only want the take profit to be set when the difference between the order’s open price and the target is less than 5 pips away, we will apply the same logic as the previous page of this tutorial to do so. Also, we will set the TP to the value of PSAR only if PSAR is below the current price, so the direction of the price is up. So, in short, if the price is moving up, we will check if the remainder of open price modulo 50 pips is bigger than 45 pips:
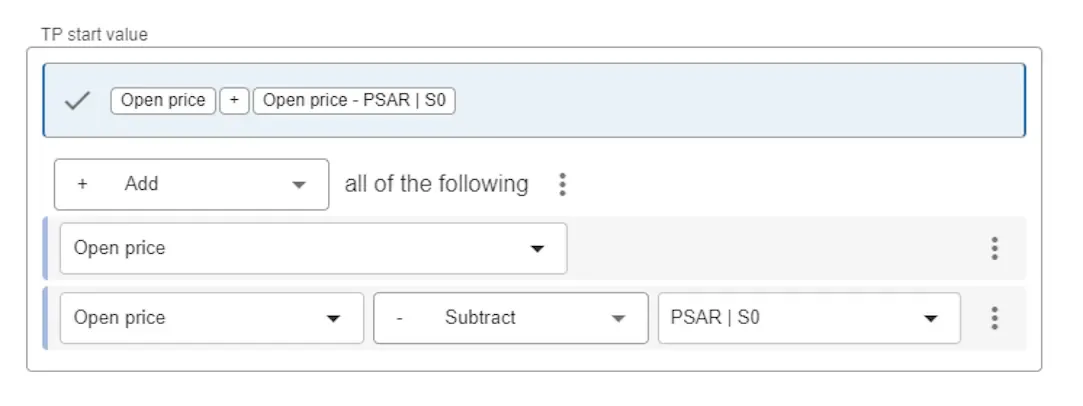
Next, we’re going to set the value of take profit to the value of the order’s open price + the distance to PSAR:
We will not enter a condition when to remove the take profit, so we will leave the last condition empty. We do however set the last values:
- Trail distance (pips): 0
- Trail step size: 0
- Close percentage: 100
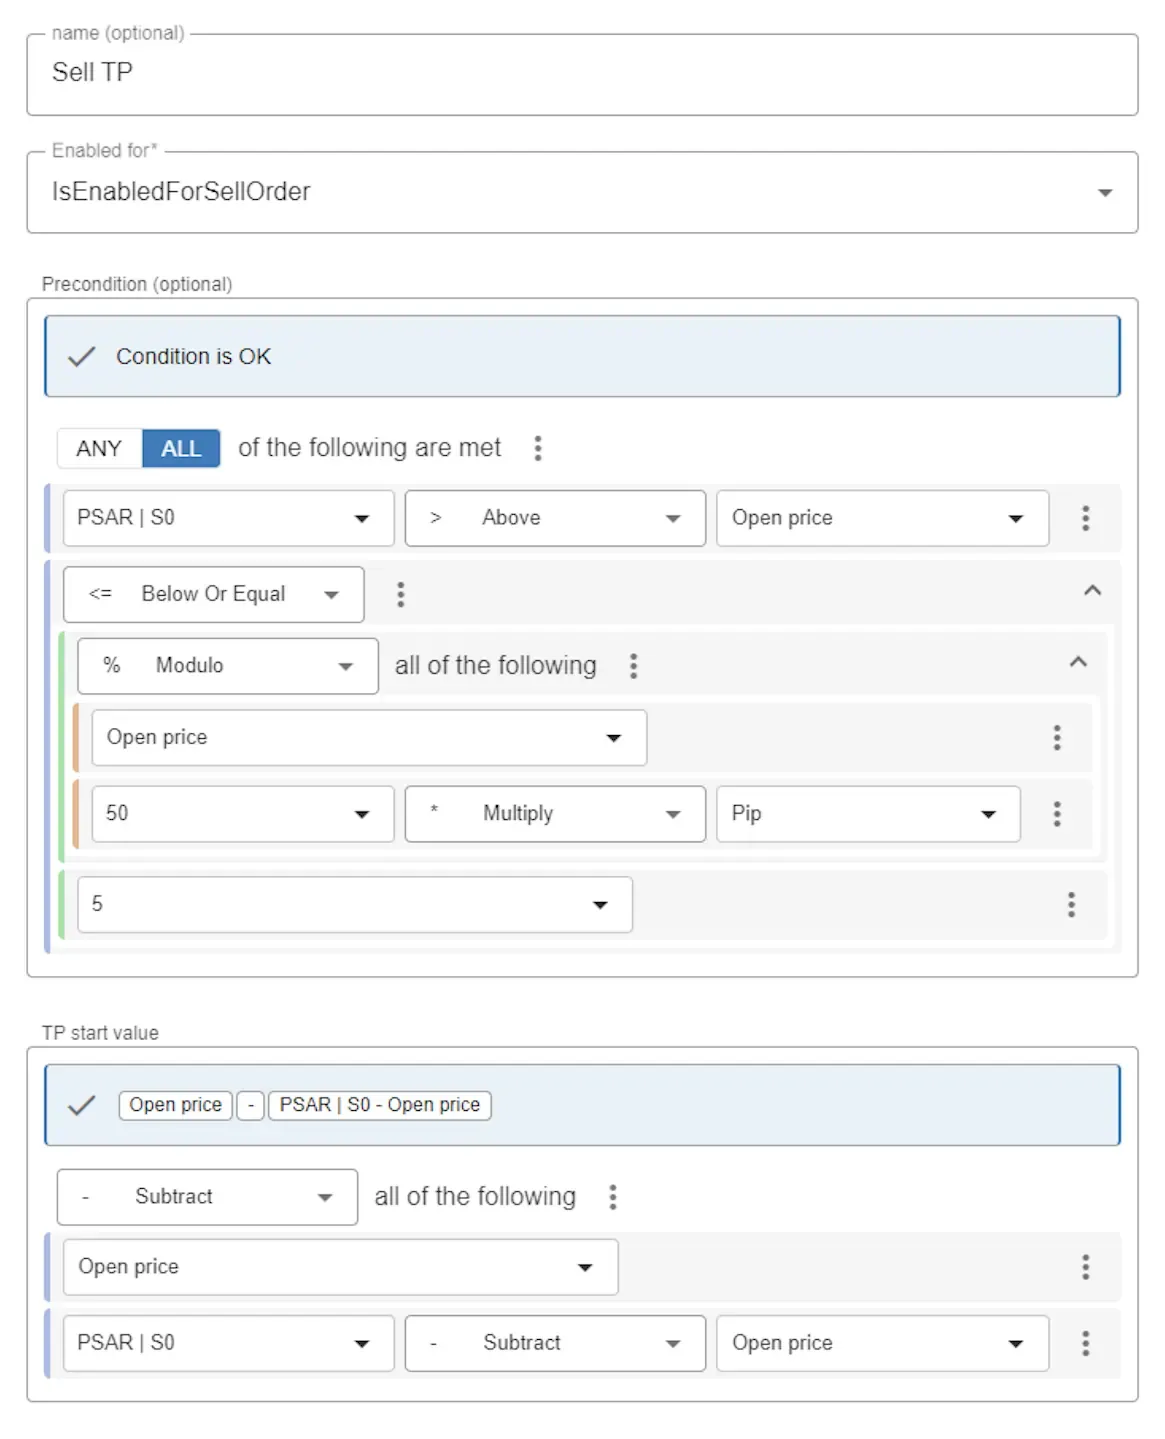
We will also add the same Take profit - Conditional (Pro) for sell orders. Here’s how we set it up:
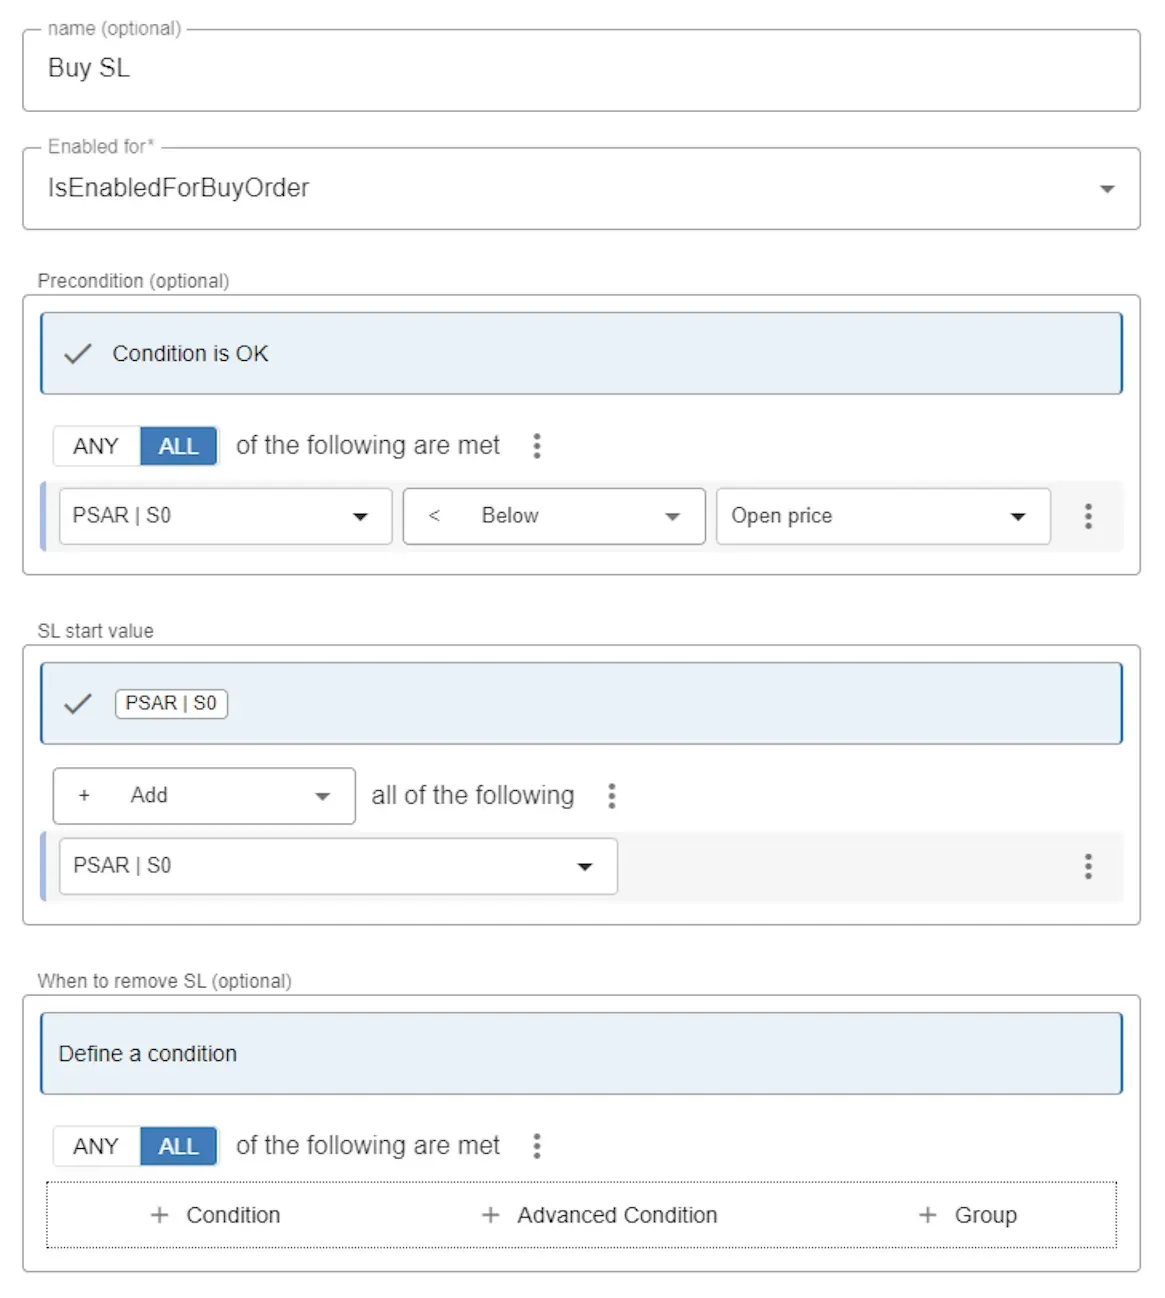
Now we will add the stop loss modules, which are easier to configure because they have a simple precondition: we simply always set the value of stop loss to the order’s price minus PSAR, if PSAR is above the current price. So, the precondition (for buy) is if PSAR is above the current price. The start value is the value of PSAR.
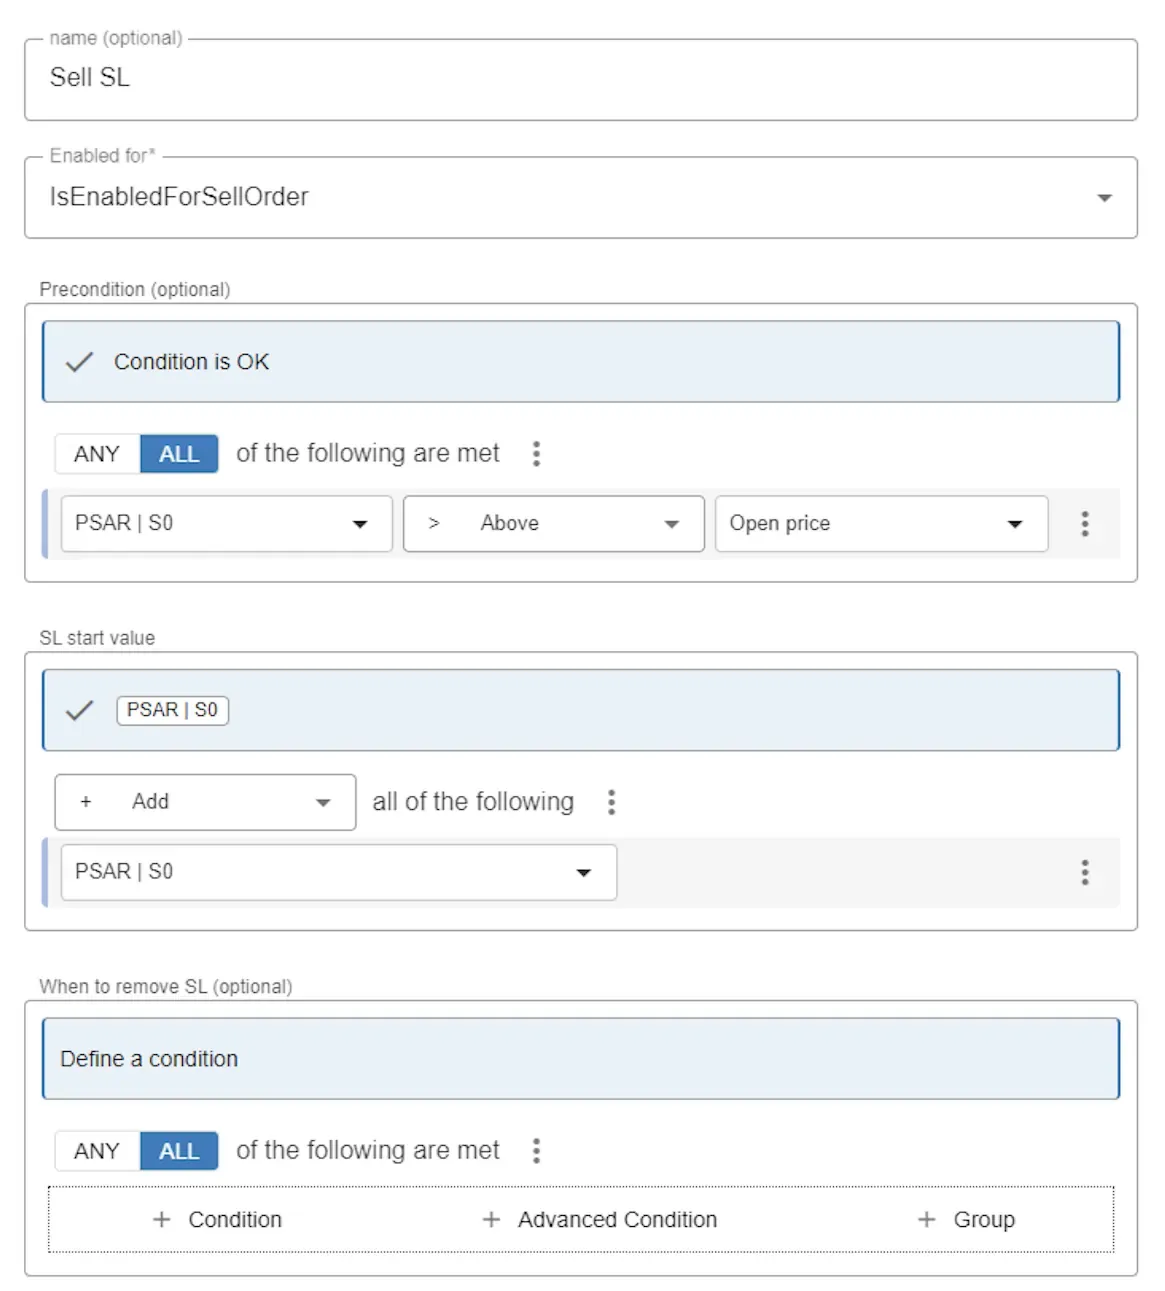
And for sell, the precondition is the opposite, but everything else is the same:
If you want to know more about Modules and what they’re capable of, please check the in-dept Modules documentation. You will be surprised about the flexibility you can create by using modules. To see an example, check out this blog: How to set stop loss based on the ATR indicator?
5. Summary
Section titled “5. Summary”You’ve now completed your first fully working EA!
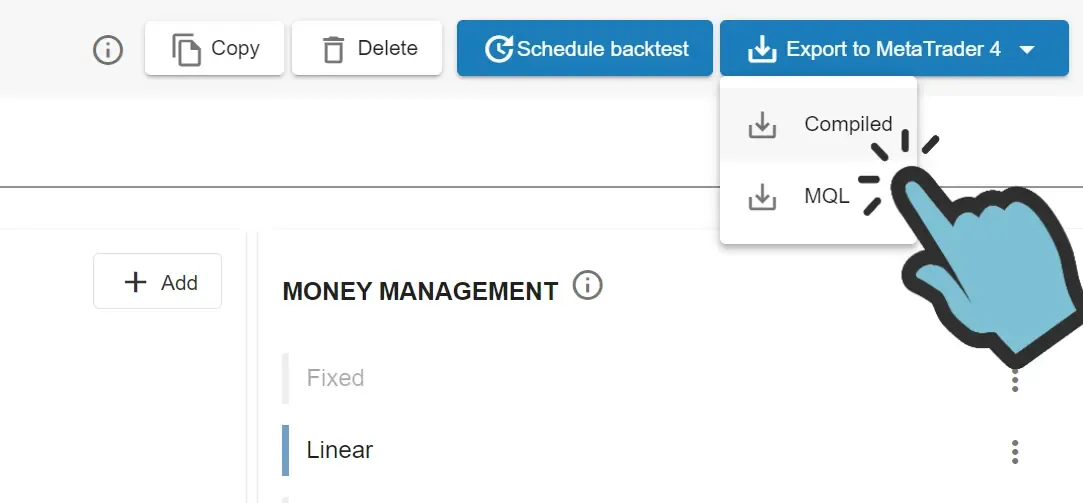
You can now export your EA and use it in MetaTrader. If you need detailed instructions, go see our tutorial on how to run your first EA.
We advise the following next steps:
- Test your EA in MetaTrader by running a backtest. Make sure you enable ‘Visual mode’, so you can, visually, confirm the orders are opened and closed when expected. If you have any doubts if you made any mistakes when following this tutorial, you can compare your EA to the ‘Tutorial - Cowabunga’ template EA, which you can choose when adding a new EA to your account.
- If you need further assistance in configuring your EA, please Subscribe and contact us with your question(s). We will answer and provide examples until you’ve met your goal.
- Tune your EA by improving the EA’s Input values. If you’re using the free version of EA Builder Pro you can change the settings in EA Builder Pro. If you’re a subscriber, you can optimize the inputs (automatically) in MetaTrader.
- When you think you’ve got a well working EA and you’d like to put it to real use, please run the EA on a Demo Account until you are sure the EA is working as expected. We strongly advise running the EA on a VPS (more info).
- Run your EA on a Demo account for a long enough time. Mind you that running the EA for about a week is not generally considered a long enough time. We personally verify at least 200 orders manually and at the very least run the EA for 3 months on a Demo account before transferring to a Live account. Mind you that we are not eligible to give financial advise. The decision to put an EA on a Live account (and based on which information) is your responsibility.
We thank you for sticking with us through this tutorial and we hope to keep seeing you around! Over a 50.000 traders were here before you. More than 2 million tests were executed using our online backtester!