Use indicator in Trading Signal
The previous plans helped you find your mode(s). In the example, we followed these plans to find modes for an arrows indicator. Do note that the procedure for finding modes for other type of indicators is identical and should be followed in exactly the same manner.
Now we’ll look at using the indicator in your Buy/Sell signals.
Depending on what type of indicator you’re using, the signal will be slightly different, but logical once you understand. There are 4 common types of indicator values:
- An object, like an arrow.
- A colour switch.
- A line crossing a level.
- A line crossing another line.
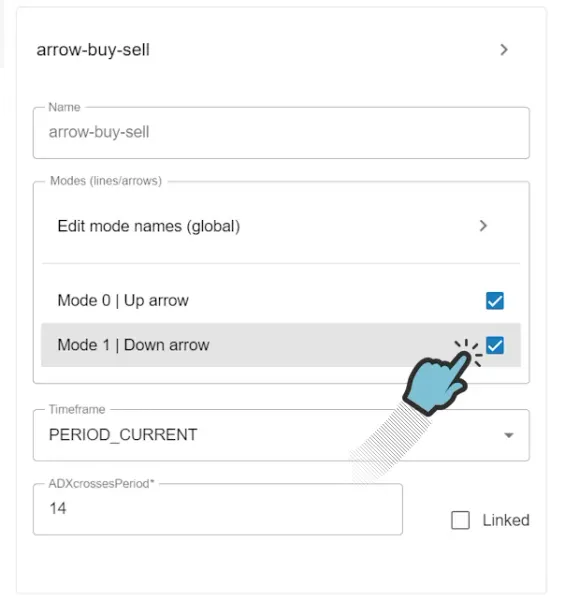
When adding the indicator to your EA, ensure that all the modes you intend to use are selected. Any modes not selected will be filtered out to prevent clutter.
How to set your signal for an arrow indicator
Section titled “How to set your signal for an arrow indicator”Now that you’ve found your modes, renamed them and enabled them when adding your indicator, it’s now time to create the condition(s) which will make your EA open and/or close orders.
Arrows are painted on the chart by MetaTrader when a mode gets a value. The arrow is placed at the value of this mode. Often an Up arrow is painted a little under the bar and a Down arrow is painted a little above the bar. This explains why the value of the mode you’re seeing is always a bit above or below the price. The thing about the arrow indicators is that it doesn’t matter which value they have, we only want to know if they’re painted. In other words we just want to buy or sell when the mode has a value, meaning it’s not empty.
We’re now going to create the Open Buy signal for the arrow indicator, which will contain 1 condition: the ‘Up Arrow’ must be not equal to Empty.
We can now do the same thing for Open Sell, but instead we’re selecting the ‘Down arrow’ mode. Optionally, we could duplicate the Open Buy signal to Close Sell and the Open Sell signal to Close Buy. This way, we can seamlessly switch between buying and selling whenever the arrows transition from buy to sell and vice versa.
Once you’re done, your first version of your EA is ready and you can proceed to export your EA. For a full tutorial on how to run your first EA, please see how to run our first EA together.
How to set your signal for a color indicator
Section titled “How to set your signal for a color indicator”Now that you’ve found your modes, renamed them and enabled them when adding your indicator, it’s now time to create the condition(s) which will make your EA open and close orders.
When MetaTrader paints a line on the chart, your interest may lie in either the color of the line itself or the transitions between colors. It’s possible that in fact the colored line consists out of 2 seperate modes: one for green and one for red. If that’s the case, which you found out about in the plan for finding modes, then setting up the Buy/Sell signal is exactly the same as setting up the signal for arrows. The only difference is you’ll call your modes ‘Green’ and ‘Red’, instead of ‘Arrow Up’ and ‘Arrow Down’.
In other cases, you may have found 1 mode which contains the value of the color by comparing what you’re seeing on the chart with what you see in the Data Window or Buffer Reader export. For example, when a mode has value -1 the line is red line and when it has value 1 the line is green. Sometimes there’s a third color, like a value 0 for gray. If this is the case, then the logical thing to do is create a Open Buy signal which checks if the value of the color mode is 1. For Open Sell, create a condition which checks if the value of the same color mode is -1. I hope you’re starting to get the logic of this.
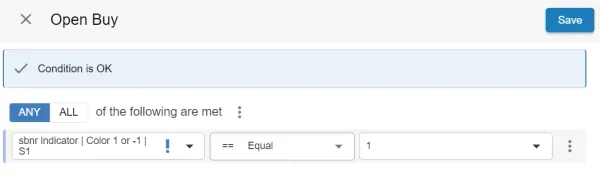
We can now do the same thing for Open Sell by selecting the same indicator mode, but this time check if the value is -1. Optionally, we could duplicate the Open Buy signal to Close Sell and the Open Sell signal to Close Buy. This way, we can seamlessly switch between buying and selling whenever the color transitions from red to green and vice versa.
Once you’re done, your first version of your EA is ready and you can proceed to export your EA. For a full tutorial on how to run your first EA, please see how to run our first EA together.
Using Shift when Adding Your Indicator to a Signal
Section titled “Using Shift when Adding Your Indicator to a Signal”When adding the conditions, you may have noticed the ‘Shift’ setting. When setting the ‘Shift’ value to 0, you choose the indicator’s value at the current bar. ‘Shift’ 1 corresponds to the previous bar, ‘Shift’ 2 to the next bar, and so forth. It’s crucial to select the ‘Shift’ that corresponds to the bar at which you intend to execute buy/sell actions. For instance, if you wish to avoid buying when the current bar displays an arrow (due to potential repainting), consider using ‘Shift’ 1. Often, the arrow is not painted on the current bar at all, depending on the indicator. If our analyzer determines that the selected ‘Shift’ will never yield a value, a red exclamation mark (!) will be displayed as a warning. A blue exclamation mark indicates that the selected ‘Shift’ may be repainting. While we strive for accuracy, please conduct your own research as we cannot guarantee the validity of this informational warning at all times.
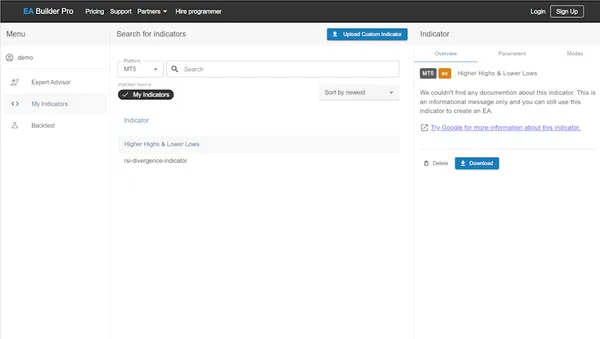
My Indicators page
Section titled “My Indicators page”Besides uploading an indicator when adding an indicator to your EA, you can also use the ‘My Indicators’ page. Here you can upload, download or delete your custom indicators. If you would like to delete a custom indicator, make sure it is not used by any of your EAs or else it cannot be deleted.